News
News
A Dust Collector Valve must deliver a reliable pulse of compressed air that cleans cartridge filters without wasting air or shortening component life. Before comparing prices, check your dust collector design, operating conditions, valve performance, connections, and control system. This guide explains each decision in a practical order so maintenance teams, engineers, and purchasing staff can specify a compatible valve with fewer surprises.
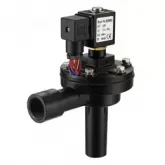
Use the product image below as a visual reference while reviewing valve configuration and installation details.

When comparing products from Xingyu or other suppliers, confirm the published performance data against your collector and controller requirements instead of selecting by appearance or nominal port size alone.
Confirm that the equipment uses a pulse-jet cleaning system and record how its cartridge filters are arranged. Note the number of valves, the number of cartridges cleaned by each pulse, the manifold layout, and whether the system operates continuously or in cleaning cycles. A valve intended for a different dust collector arrangement may not provide the pulse volume or timing your cartridges need.
Collect actual operating data before requesting a quote. Record the compressed-air pressure at the manifold while the collector is running, not only the compressor nameplate pressure. Also note the air temperature, ambient temperature, humidity, and any oil, moisture, corrosive gas, or outdoor exposure. These conditions affect valve operation, seal life, coil selection, and enclosure requirements.
If you are replacing a valve, photograph its label, body, ports, pilot connection, coil, and wiring before disassembly. Record the existing model number, connection standard, voltage, and any visible failure symptoms. If the original model is unavailable, measure the installation and compare the valve data with the collector manual. Do not assume that a similar-looking valve is interchangeable.
Cartridge dust collectors commonly use diaphragm pulse valves designed to release a short burst of compressed air. Depending on the system, the valve may be pilot-operated or configured with an integral pilot. Match the operating principle and pilot arrangement to the collector piping and pulse controller. A different arrangement can require additional components or prevent the valve from opening and closing correctly.
Confirm that the valve can respond to the controller's electrical pulse and recover between cleaning cycles. Check the specified pulse duration and the recommended operating frequency in the product documentation. If the valve is too slow, undersized, or operated outside its rated conditions, the cleaning pulse may be weak or inconsistent. The controller and valve specifications must be considered together.
Review how the diaphragm, pilot, coil, and other serviceable parts are accessed. A valve that is easy to inspect and maintain can reduce downtime, especially when many valves are installed in one collector. Ask whether replacement diaphragms, coils, and repair kits are available and whether the valve can be serviced without removing the entire manifold assembly.
Nominal port size describes a connection, but it does not by itself prove that a valve delivers enough air for the cleaning pulse. Check the manufacturer's flow capacity, effective orifice or equivalent performance data, recommended manifold size, and operating pressure range. Compare these figures with the dust collector manufacturer's requirements. When the collector documentation does not specify valve capacity, provide the collector model and system details to the valve supplier for confirmation.
The valve needs adequate inlet pressure and air volume during each pulse. Pressure loss in undersized piping, a restricted filter, a long air line, or a poorly sized manifold can reduce performance even when the valve is correctly selected. Check the pressure at the valve inlet during operation and confirm that the receiver, compressor, and air treatment equipment can support the pulse sequence without excessive pressure drop.
Confirm the inlet and outlet connection size, thread or connection standard, face-to-face dimensions, mounting arrangement, and direction of flow where specified. Check the manifold opening and clearance for the valve body and coil. A mismatch may require adapters, create extra leak points, or prevent correct installation. Confirm all dimensions against the manufacturer's drawing before ordering a replacement.
Check the valve body, diaphragm, seals, and other wetted materials against the compressed-air quality, temperature, and ambient conditions. Elastomer options can have different temperature and chemical resistance. Do not choose a material based only on a general label such as standard or heavy duty. Ask the manufacturer to confirm the recommended material for your conditions, particularly if the air is hot, humid, oily, or exposed to chemicals.
Verify the coil voltage, AC or DC supply, frequency where relevant, connector type, and electrical rating. Confirm that the controller output can operate the selected coil and that the wiring arrangement matches the valve. A coil with the wrong voltage or supply type may fail to actuate, overheat, or be damaged. Check whether the coil requires a particular connector or protective device.
Review the required ingress protection and any site-specific electrical or hazardous-area requirements. The coil enclosure should suit the dust, moisture, washdown, and temperature conditions at the installation point. Follow local electrical codes and the valve manufacturer's instructions. If the installation is in a regulated or hazardous location, obtain the required certification documents before purchase.
Write down the collector make and model, cartridge arrangement, number of valves, cleaning sequence, operating hours, and installation location. Include the type of dust and any unusual environmental conditions. This creates a clear specification for suppliers and reduces repeated questions during quotation.
Measure or verify the compressed-air pressure at the manifold during operation. Record the air supply capacity, pipe sizes, manifold dimensions, temperature range, and available electrical supply. Use verified site data wherever possible. If you cannot measure a condition safely, identify it as unknown and ask a qualified technician or supplier to help confirm it.
Determine whether the system requires a diaphragm pulse valve, the appropriate pilot arrangement, and the correct connection and mounting style. Use the collector manual, existing valve documentation, and system drawings. For a replacement, compare the original model specification rather than relying only on a visual match.
Compare operating pressure range, flow data, port and connection dimensions, response requirements, temperature rating, material options, and coil specification. Check that the valve is suitable for the controller's pulse output and the manifold's air supply. Ask the supplier to confirm compatibility in writing if any system requirement is unclear.
Review the product drawing, wiring diagram, mounting orientation, clearance, and maintenance instructions. Confirm whether adapters, connectors, or additional pilot components are required. Check availability of replacement diaphragms and coils, warranty terms, lead time, and technical support before finalizing the purchase.
Put the complete specification on the purchase order, including model number, quantity, connection standard, coil voltage, material options, and any required certificates. Request confirmation that the offered valve matches the collector and operating conditions. Keep the approved drawing and product data with the maintenance records for future replacement.
The following tools help verify a replacement and inspect the installation. Use tools only when the equipment is isolated and safe to access.
Depressurize and isolate the compressed-air system before removing a valve. Isolate electrical power before inspecting or disconnecting the coil. Follow lockout and tagout procedures and site safety rules. Never loosen a pressurized connection or energize exposed wiring to test a valve. Have a qualified technician perform measurements or tests that require energized equipment.
A matching port size does not establish that the valve has the required flow capacity, pressure range, or response. A low purchase price can also be outweighed by air waste, frequent maintenance, or replacement downtime. Compare technical suitability and expected service requirements alongside unit price.
A valve cannot deliver a reliable pulse if the air supply is wet, contaminated, restricted, or too low in pressure. Check the system as a whole, including filters, regulators, piping, receiver capacity, and manifold pressure. A weak cleaning pulse may result from the air supply rather than a defective valve.
Do not assume that all coils use the same voltage or connector. Verify the controller output, supply type, coil rating, pulse duration, and wiring arrangement. Confirm that the chosen valve can operate at the frequency required by the cleaning sequence.
Similar dimensions and appearance do not guarantee equal flow, materials, pilot configuration, or electrical performance. Compare model data and drawings, and obtain supplier confirmation where the original part number is obsolete or incomplete.
Missing product drawings, unclear warranty terms, or unavailable diaphragms can cause installation delays and extended downtime. Confirm documentation, spare-part availability, lead time, and after-sales support before placing an order.
Send each supplier the same operating data and ask for the proposed model, performance data, material details, coil specifications, drawings, and stated compatibility. A quote that only lists a model and price is difficult to evaluate. Ask suppliers to identify any assumptions, excluded components, or recommended changes to the existing installation.
Compare more than the purchase price. Consider expected maintenance, replacement parts, energy and compressed-air use, warranty, delivery time, and the cost of production downtime. A valve with suitable documented performance and accessible service parts may be a better fit than a cheaper option with uncertain compatibility.
Before ordering, provide Xingyu or another qualified supplier with the collector details, measured pressure, connection dimensions, controller and coil data, environmental conditions, and required quantity. Request a written recommendation and verify it against the final product data sheet. Clear information helps the supplier identify the correct Dust Collector Valve and reduces the risk of a costly mismatch.
The right Dust Collector Valve for cartridge filters is the one that matches the collector's pulse requirements, air supply, connections, materials, and control system. Follow the steps in this guide, verify the technical data before purchase, and keep the approved specification for maintenance and future orders.